

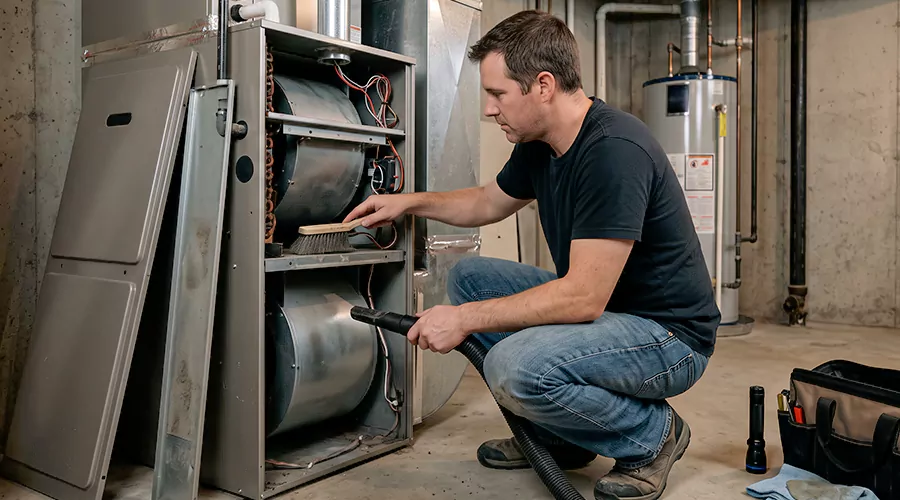
Cleaning an air handler involves replacing a dirty air filter, removing appropriate deposits from the blower and indoor cooling coil, and checking the condensate pan and drain. Homeowners can usually maintain accessible filters and surrounding areas, but air handler unit cleaning involving internal coils, blower assemblies, and electrical compartments is best handled by a qualified HVAC technician.
An air handler is the indoor part of many central heating and cooling systems. It contains a blower that moves air through the ductwork and often houses the evaporator coil that removes heat during cooling. The cabinet may also contain electric heating components or other controls, depending on the system design.
As the equipment operates, dust and other particles can accumulate on internal surfaces. Moisture is also present around the cooling coil because the air conditioner removes humidity from indoor air. If deposits restrict airflow or the condensate drain becomes blocked, the system may experience cooling problems or water damage.
Air-handler cleaning must account for these different components. A filter can be replaced through a designated access slot, while the blower and evaporator coil may be located behind service panels near electrical connections. Proper maintenance removes unwanted buildup without damaging delicate equipment or introducing water into parts that must remain dry.
What Is an Air Handler?
An air handler is equipment that moves conditioned air through a home's heating and cooling ductwork. Its main components commonly include a blower, air filter location, cooling coil, and cabinet. Some systems also contain electric heating elements or auxiliary heat strips.
The air handler is usually connected to a heat pump or central air conditioning system. In a gas furnace installation, the furnace cabinet often performs the air-moving function instead. Although the two arrangements share some maintenance tasks, fuel-burning equipment includes additional components and safety requirements.
Air handlers may be installed in attics, closets, basements, or utility rooms. Their location affects how easily filters and internal components can be reached. A unit in an unfinished attic may require more attention to safe access than one installed at floor level in a utility closet.
Main Components Inside an Air Handler
Understanding the main parts helps homeowners distinguish ordinary maintenance from work that requires professional service.
| Air Handler Component | Main Function | Cleaning or Maintenance Concern |
|---|---|---|
| Air filter | Captures particles from circulating air | Dust loading and poor fit |
| Blower wheel | Moves air through ducts | Dust buildup on blades |
| Blower motor | Drives the fan | Electrical and mechanical condition |
| Evaporator coil | Removes heat during cooling | Dirt on fins and restricted airflow |
| Condensate pan | Collects water from cooling coil | Sediment and standing water |
| Condensate drain | Carries water away from equipment | Blockage or poor drainage |
| Cabinet interior | Houses system components | Loose dust and moisture |
| Internal insulation | Limits heat transfer and noise | Water damage or deterioration |
| Electrical controls | Operate equipment | Requires qualified handling |
The table identifies common components rather than a universal arrangement. Air handler designs differ between manufacturers, and some systems combine several functions in one enclosure. Consult the model's service instructions before determining which parts can be accessed safely.
Why Does an Air Handler Need Cleaning?
Air handlers need cleaning when deposits interfere with airflow, cooling performance, or condensate drainage. A dirty filter is often the first problem because it creates resistance to air moving through the equipment. If the filter is missing or poorly fitted, particles may collect farther inside the cabinet.
Dust on the evaporator coil can reduce heat transfer and restrict air passing through its fins. The system may then operate longer to cool the home. ENERGY STAR recommends inspecting and cleaning air conditioning coils as part of routine equipment maintenance.
The blower wheel is another component affected by buildup. Deposits on its blades can change airflow performance and place additional demands on the equipment. Detailed cleaning may be necessary when the material is substantial.
Moisture control is equally important. The cooling coil produces condensation that must drain away through the pan and condensate line. A blocked or damaged drainage system can cause water to collect inside the cabinet or leak into surrounding building materials.
Cleaning addresses deposits, but it cannot repair every mechanical problem. A failed blower motor or refrigerant leak requires a different diagnosis. The maintenance plan should match the actual condition of the equipment.
What Are the Signs of a Dirty Air Handler?
A dirty air handler can produce symptoms involving airflow, cooling performance, or moisture. However, these signs are not unique to cleaning problems. Electrical defects and duct restrictions may create similar symptoms, so the actual components should be inspected.
Watch for the following signs:
- The air filter becomes heavily loaded with dust.
- Airflow from several supply registers becomes weaker.
- The cooling system runs longer than usual.
- Dust is visibly accumulating around the filter compartment.
- The evaporator coil has significant visible deposits.
- The blower wheel contains thick dirt on its blades.
- Water collects around the indoor unit.
- The condensate pan contains standing water.
- A musty odor occurs near moisture-affected components.
- The cooling coil repeatedly freezes.
- The equipment makes unusual blower noises.
- Cooling performance declines without an obvious thermostat issue.
These conditions require different responses. A dirty filter may be corrected through ordinary replacement, while an iced evaporator coil can involve airflow or refrigerant problems. Water beneath the unit may indicate a blocked drain or another source of leakage.
Repeated freezing or water overflow should not be treated as routine dust. Stop normal operation when continuing to run the equipment could worsen the problem, and arrange qualified diagnosis.
What Can Homeowners Safely Clean on an Air Handler?
Homeowners can usually perform maintenance involving manufacturer-designated filter access and ordinary surfaces around the equipment. The manufacturer's instructions determine the appropriate tasks. Internal components behind service panels often require electrical isolation and specialized cleaning methods.
| Maintenance Task | Suitable for Homeowners? | Main Precaution |
|---|---|---|
| Replace accessible disposable filter | Usually yes | Use correct size and airflow direction |
| Clean approved reusable filter | Usually yes | Follow washing and drying instructions |
| Vacuum nearby floor or closet surfaces | Usually yes | Keep debris away from unit openings |
| Clean accessible return grille | Usually yes | Do not restrict return airflow |
| Inspect visible condensate drain outlet | Usually yes | Do not dismantle drainage equipment |
| Remove internal blower assembly | No | Electrical and mechanical hazards |
| Clean evaporator coil behind service panel | Qualified technician recommended | Delicate fins and nearby components |
| Open electrical control compartment | No | Shock and stored-energy hazards |
| Service refrigerant piping | No | Requires qualified refrigeration work |
| Repair damaged internal insulation | Qualified technician recommended | Material and moisture concerns |
A homeowner should not assume that turning the thermostat off removes every electrical hazard. Some equipment contains components that remain energized or can store electrical energy after shutdown. Internal service panels should be opened only under the procedures appropriate for that system.
The most useful household maintenance usually involves filters and keeping the return path clear. These simple tasks can reduce the amount of dust reaching the blower and cooling coil.
How to Clean an Air Handler Step by Step?
A thorough air-handler cleaning combines routine homeowner preparation with qualified internal service. The exact procedure varies by equipment model and installation. The steps below explain the recommended sequence while identifying work that should be performed by an HVAC technician.
Step 1. Identify the Air Handler and Its Filter Location
Start by locating the indoor equipment and reviewing its maintenance instructions. Some air handlers have a filter slot in the return duct, while others use a cabinet filter or filters at designated return grilles. Identify the actual filter arrangement before removing anything.
Check the equipment model when the instructions are unavailable. Filters differ in size, thickness, and performance requirements. Using an incorrect replacement can leave gaps or create unnecessary airflow resistance.
The surrounding area should also be inspected for safe access. A unit installed in an attic may be difficult to reach without an appropriate walkway. Routine maintenance should not require stepping onto unsupported ceiling materials.
Step 2. Turn Off the HVAC System
Switch off heating and cooling operation at the thermostat before beginning household maintenance. Allow the blower to stop completely. This prevents the filter from being pulled or disturbed by normal airflow while it is being removed.
For internal cleaning, a qualified technician should isolate electrical power using the equipment's designated disconnect or breaker and verify a safe working condition. The procedure may involve more than switching off the thermostat. Electrical components should never be handled on the assumption that the unit is safe simply because the blower is not running.
Do not remove electrical control panels or touch internal wiring. Leave the equipment fully assembled except for manufacturer-approved homeowner access points.
Step 3. Remove and Inspect the Air Filter
Open the designated filter access point according to the manufacturer's instructions. Slide out the filter carefully so accumulated dust does not fall into the cabinet. Examine it for heavy deposits, damage, and gaps that may have allowed particles to bypass the media.
A dirty filter can restrict airflow and allow other problems to develop when replacement is delayed. However, a new filter must also be compatible with the equipment. A higher filtration rating is not automatically better if it creates excessive resistance.
Check whether the existing filter is disposable or washable. The cleaning and replacement method depends on that distinction.
Step 4. Replace or Clean the Filter
Replace a disposable filter with the correct size and type specified for the system. Follow the airflow arrows printed on the filter frame. The filter should fit securely without significant gaps around the edges.
If the unit uses a manufacturer-approved washable filter, clean it according to its instructions. Do not reinstall a filter while it remains wet. Moisture may affect the filter material or surrounding components.
Check the filter regularly during heavy heating and cooling use. ENERGY STAR recommends monthly inspection as a useful maintenance practice. The actual replacement interval depends on filter type and operating conditions.
Step 5. Clean the Accessible Surrounding Area
Use a vacuum or microfiber cloth to remove ordinary dust from the floor and nearby surfaces surrounding the air handler. Keeping the area clean reduces loose material near service openings. Avoid placing storage items against the cabinet or blocking return air passages.
A utility closet may contain household dust that has nothing to do with internal equipment contamination. Cleaning the area can improve housekeeping without requiring the cabinet to be opened. Do not spray water or cleaning products into ventilation openings.
Look for visible water stains around the base of the unit. Document any moisture rather than simply wiping it away repeatedly. A recurring leak requires investigation.
Step 6. Inspect the Cabinet and Internal Surfaces
During professional service, the technician removes approved access panels after completing electrical isolation. The cabinet interior is inspected for dust and moisture. The inspection should identify deposits on the coil or blower, along with deteriorated insulation.
Sound nonporous surfaces may be cleaned using appropriate methods. Internally insulated areas need more care because aggressive brushing can release fibers or damage the material. Wet or moldy insulation may require replacement rather than ordinary cleaning.
The technician should also look for evidence that air is bypassing the filter. Gaps around the filter housing can allow particles to enter downstream components. Correcting those openings may reduce future buildup.
Step 7. Clean the Blower Assembly
A qualified technician examines the blower wheel and housing for accumulated dust. A wheel with substantial deposits may require careful cleaning to restore its condition. The method depends on whether the assembly can be cleaned in place or must be removed.
The blower motor and electrical connections should be protected throughout the process. Water and cleaning chemicals must not be introduced into components that are not designed to become wet. Specialized cleaning may require removing the wheel from the housing.
A damaged blower wheel or motor requires a separate repair. Cleaning should not be used to conceal cracks, worn bearings, or other mechanical defects. The assembly must be restored correctly before normal operation resumes.
Step 8. Inspect the Evaporator Coil
The evaporator coil is one of the most delicate components inside the air handler. Its closely spaced fins allow air to pass over the cooling surface while heat is transferred to the refrigerant. Dust or grime covering these surfaces can reduce performance.
A technician should inspect the coil before selecting a cleaning method. Light dry deposits may be removable using a soft brush or suitable vacuum attachment. More substantial buildup may require a coil cleaner approved by the equipment and product manufacturers.
The coil's condition should also be checked for signs of icing or damage. A frozen coil may indicate restricted airflow or a refrigerant problem. Cleaning alone should not be assumed to correct repeated freezing.
Step 9. Clean the Evaporator Coil With a Suitable Method
Qualified coil cleaning begins with controlled removal of loose deposits. The technician may use a soft brush or cleaning product designed for indoor coils. Care is required because thin aluminum fins bend easily and can restrict airflow when damaged.
Do not use a pressure washer or stiff metal brush on the indoor coil. Aggressive cleaning can damage fins, connections, and surrounding components. The coil manufacturer's instructions determine whether rinsing is permitted and how wastewater should be managed.
Electrical controls and absorbent insulation must remain protected from cleaning liquids. If heavy contamination requires more work than in-place cleaning can provide, the technician should explain the alternative. Removing a coil can involve refrigerant system work and is not an ordinary homeowner task.
Step 10. Inspect and Clean the Condensate Pan
The condensate pan collects water that forms on the cooling coil. During normal operation, this water should flow toward the drain and leave the equipment. Deposits or damaged drainage components can cause water to remain in the pan.
The technician should inspect the pan for sludge, cracks, and signs of overflowing. Suitable cleaning methods can remove deposits from sound nonporous surfaces. Wastewater must be controlled so it does not reach electrical components or nearby building materials.
A pan that repeatedly retains standing water may have a drainage or installation problem. Cleaning the surface alone will not correct improper slope or a damaged outlet. The cause should be identified before returning the unit to normal use.
Step 11. Check the Condensate Drain Line
The condensate line carries collected water away from the air handler. A blockage can cause the pan to overflow or activate a safety float switch. If the system shuts down because of a drainage problem, the line should be evaluated before operation continues.
A qualified technician may use suitable vacuum or drain-clearing equipment to remove an obstruction. The correct method depends on the drain arrangement and manufacturer's instructions. Uncontrolled compressed air or excessive pressure can damage connections or push debris into another section.
Do not automatically pour bleach or other chemicals into the drain. Some manufacturers permit specific maintenance solutions under defined conditions, while others recommend different procedures. Product compatibility and the equipment instructions should guide the work.
Step 12. Inspect Internal Insulation and Cabinet Seals
The technician should check whether cabinet insulation is securely attached and dry. Damaged insulation can release fibers or allow unwanted heat transfer. Moisture-affected material may also become unsuitable for continued use.
Cabinet panels and seals should fit properly after service. Gaps can allow unfiltered air to enter certain parts of the system, depending on the equipment's pressure conditions. Correcting damaged seals helps preserve the intended airflow path.
The repair should not leave loose insulation near the blower or inside the air passage. Material replacement should use components suited to the specific equipment.
Step 13. Reassemble the Air Handler
After cleaning and inspection, all serviced components must be returned to their correct positions. The blower housing, access panels, filter, and related parts should be secured according to the manufacturer's requirements. Loose panels can rattle or allow unintended air movement.
Cleaning products and tools should be removed from the cabinet before power is restored. The technician should check that no wires or tubing were disturbed during service. Equipment should not be operated with protective panels missing unless a qualified procedure specifically requires it for testing.
Step 14. Verify Normal System Operation
A qualified technician restores power and checks the equipment through an appropriate operating cycle. Blower operation, cooling performance, and condensate drainage should be evaluated. Unusual noises and water leaks should be investigated before the service is considered complete.
The technician may also check airflow or temperature performance when the original problem involved poor cooling. Cleaning can remove deposits, but it does not correct an incorrectly sized duct or failing motor. Any remaining defect should be documented and discussed separately.
A final filter check confirms that the correct media is installed and fitted properly. The system should be left ready for normal operation with all service panels securely attached.
How Do You Clean an Air Handler Filter?
The air filter is usually the most accessible maintenance component. It should be inspected according to the equipment manufacturer's schedule and replaced when necessary. The filter should not be handled while the blower is operating.
For a disposable filter, remove it through the designated access opening and install a suitable replacement. Pay attention to the direction of airflow and the filter's fit. A loose filter may allow air to bypass the media, while an overly restrictive replacement can reduce airflow.
Washable filters require a different procedure. Clean them only with methods approved by the filter manufacturer and allow them to dry completely. Do not substitute a disposable filter with a homemade washable material.
Filter maintenance reduces unwanted deposits reaching the equipment, but it does not replace cleaning an evaporator coil or blower that is already heavily contaminated.
How Do You Clean an Air Handler Evaporator Coil?
An evaporator coil requires gentle cleaning because its fins are thin and closely spaced. Dirt can accumulate on the entering-air side and reduce the amount of air moving through the coil. This can contribute to longer cooling operation or icing under certain conditions.
Carrier and Trane recommend qualified professional cleaning for indoor evaporator coils. The technician may remove dry particles with a soft brush or vacuum attachment and use a suitable coil-cleaning product when necessary. Cleaning should not damage the fins or wet nearby electrical components.
Coil cleaners are not interchangeable. Some products require rinsing, while others are designed for specific applications. The equipment and cleaner manufacturers' instructions should determine which method is used.
A coil that repeatedly freezes should receive further diagnosis rather than repeated cleaning alone. Restricted airflow is one possible cause, but refrigerant and control problems can also contribute.
How Do You Clean an Air Handler Blower Wheel?
The blower wheel contains blades that move indoor air through the HVAC system. Dust can accumulate on these blades, particularly when particles bypass the filter. Heavy deposits can change the wheel's airflow characteristics and may create vibration or noise.
Cleaning may involve removing the blower assembly from the cabinet. This requires working around electrical connections and securing the wheel correctly during reinstallation. A qualified technician should perform the work because an improperly reassembled blower can damage equipment.
The cleaning method should avoid soaking the motor or electrical components. Brushes and suitable cleaning products may be used on the appropriate wheel surfaces. The technician should also inspect the housing for debris before reassembly.
A blower that remains noisy after cleaning may have a mechanical problem. Worn bearings or damaged components require repair rather than additional cleaning.
How Do You Clean the Air Handler Drain Pan and Condensate Line?
The drain pan and condensate line manage water removed from indoor air during cooling. Deposits can accumulate in these components and restrict drainage. Standing water may eventually overflow and damage the surrounding building.
A qualified technician should inspect the pan and drain for blockages and damage. Accessible nonporous surfaces may be cleaned using suitable methods, while the line may require controlled clearing. Any water removed during cleaning should be collected appropriately.
The drain system should be checked for proper operation afterward. A float safety switch may stop cooling when water rises beyond an acceptable level. If the system has repeatedly shut down because of water, the underlying drainage problem must be corrected.
Do not use unknown chemicals or force tools into concealed drain piping. Drain assemblies vary by equipment, and an unsuitable method can damage traps or connections.
What Should You Never Use to Clean an Air Handler?
Some common household cleaning methods are unsuitable for internal HVAC equipment. Air handlers contain electrical assemblies and delicate cooling components that can be damaged by water or aggressive tools. The cleaning method should follow the equipment manufacturer's requirements.
Avoid these practices:
- Spraying water directly into electrical compartments.
- Using a pressure washer on the indoor evaporator coil.
- Scrubbing coil fins with stiff metal brushes.
- Pouring household bleach into the cabinet.
- Using an unapproved chemical cleaner on coil surfaces.
- Operating the unit with service panels removed.
- Touching electrical components without proper isolation.
- Forcing compressed air through the blower or coil.
- Vacuuming suspected moldy insulation aggressively.
- Reinstalling a washable filter while it is wet.
- Bypassing condensate safety switches.
- Disturbing refrigerant piping during cleaning.
A cleaning product marketed for HVAC use is not automatically suitable for every coil or cabinet material. Compatibility matters, particularly where internal insulation or coated components are present. The service technician should select products based on the actual equipment.
How Often Should an Air Handler Be Cleaned?
Air-handler maintenance follows several schedules because different components collect deposits at different rates. Filters require frequent inspection, while internal cleaning should be based on equipment condition. Manufacturers commonly recommend annual professional cooling-system maintenance.
ENERGY STAR recommends checking filters monthly and replacing or cleaning them as needed. Carrier recommends periodic filter inspection and qualified cleaning of coils and other components during scheduled service. Homes with pets or heavy dust exposure may require more frequent filter attention.
| Air Handler Component | Suggested Maintenance Approach |
|---|---|
| Air filter | Check regularly, often monthly during heavy use |
| Filter housing | Inspect during filter replacement |
| Blower wheel | Inspect during professional maintenance |
| Evaporator coil | Inspect during cooling-system service |
| Condensate pan | Check during cooling maintenance |
| Condensate drain | Inspect and clear when needed |
| Internal cabinet insulation | Check for moisture and deterioration |
| Cabinet seals and access panels | Inspect after servicing |
A component that remains clean and functional does not need aggressive cleaning simply because an appointment is scheduled. Likewise, a dirty coil should not be ignored until the next annual visit when cooling performance is affected. Actual condition and manufacturer guidance should determine the work.
Can a Dirty Air Handler Cause Weak Airflow?
Yes. A clogged filter or heavily contaminated cooling coil can restrict the air moving through the system. A blower wheel with substantial buildup may also perform differently than intended. These conditions can contribute to weak airflow at multiple registers.
However, low airflow is not always caused by dirty air-handler components. A crushed flexible duct or improperly adjusted damper can affect room airflow even when the indoor equipment is clean. The technician should identify the location of the restriction before recommending cleaning.
If airflow remains weak after filter replacement, further assessment may be necessary. Measurements can help determine whether the problem involves the blower or duct system. Repeatedly changing filters without investigating the cause may not correct the issue.
Can a Dirty Air Handler Cause Mold Problems?
Air handlers contain moisture around the cooling coil and condensate pan during normal operation. When drainage problems allow water to remain, suitable surfaces may support microbial growth. Moisture control is therefore an important part of maintaining the indoor unit.
A musty odor is not sufficient proof that the air handler contains mold. Dust and staining may look similar to growth, and odors can originate elsewhere in the building. The affected material should be evaluated before remediation is proposed.
The EPA advises correcting water problems and replacing wet or moldy internal fiberglass insulation when necessary. Applying a chemical spray without addressing moisture may not provide a lasting solution. A qualified contractor should select a response suitable for the material and condition.
When Should You Call an HVAC Professional?
Qualified service is appropriate when cleaning requires opening internal air-handler panels or handling the coil and blower. Electrical components can remain hazardous even when the thermostat is switched off. The technician should follow the manufacturer's shutdown and service procedures.
Professional evaluation is also appropriate when the unit repeatedly freezes or leaks water. These conditions can indicate airflow restrictions or mechanical problems that cleaning alone may not correct. A technician can assess the system without damaging the refrigerant circuit or electrical equipment.
Significant suspected mold and wet internal insulation also require attention beyond ordinary household dusting. The cleaning plan should correct the cause of contamination and identify materials needing replacement. Repeatedly cleaning the same wet area is not a substitute for repairing the moisture source.
How Can You Keep an Air Handler Cleaner for Longer?
Preventing excessive dirt buildup begins with the filter and return air path. A correctly fitted filter helps capture particles before they reach the blower and coil. Checking it regularly is one of the simplest ways to reduce avoidable deposits.
Keep the area around the air handler free from loose dust and stored objects that interfere with service access. Avoid blocking return grilles with furniture. Proper airflow supports normal equipment operation and makes maintenance easier.
Address any water near the indoor unit promptly. A clogged condensate line can cause damage beyond the cabinet if moisture reaches surrounding floors or ceilings. Correcting drainage issues protects both the equipment and nearby building materials.
Schedule professional maintenance according to the equipment manufacturer's recommendations. During the visit, ask the technician to document the condition of the coil and blower before recommending detailed cleaning. This helps focus the work on components that actually need attention.
Conclusion
Cleaning an air handler involves filter maintenance, checking internal deposits, and maintaining the cooling coil, blower, and condensate drainage system. Homeowners can usually replace accessible filters and clean nearby surfaces, while detailed internal service requires qualified HVAC personnel. Electrical safety and moisture control are especially important. Cleaning should correct actual buildup without damaging delicate equipment. Start by checking the filter and scheduling professional inspection when cooling performance, airflow, or drainage problems develop.